
Here are a couple of simple SOTA accessories that are not too hard to sew yourself if you have access to a sewing machine. I designed them in the interests of further reducing the weight that I carry to SOTA summits. The first one is a throw bag of my own design to replace a lead-shot filled throw bag that I have been carrying to treed summits. The second is a guy set for a hiking (trekking) pole to provide a support for a squid pole based on a design (unpublished) by Andrew VK3JBL.
Throw bag
 I have been using a lead-shot filled arborists’ throw bag for a while to get a line into a tree on a forested summit. It works well, but is a bit heavier than I would like. Rather than carry the weight, it’s more efficient to carry a bag and find a stone or other object to place in the bag. The bag can also serve double duty as a container for the throw line making a simple and compact solution for suspending antennas.
I considered purchasing a bear-bag line which are readily available in the USA. However they are usually a bit larger and heavier than needed for an antenna, so I decided to make my own.
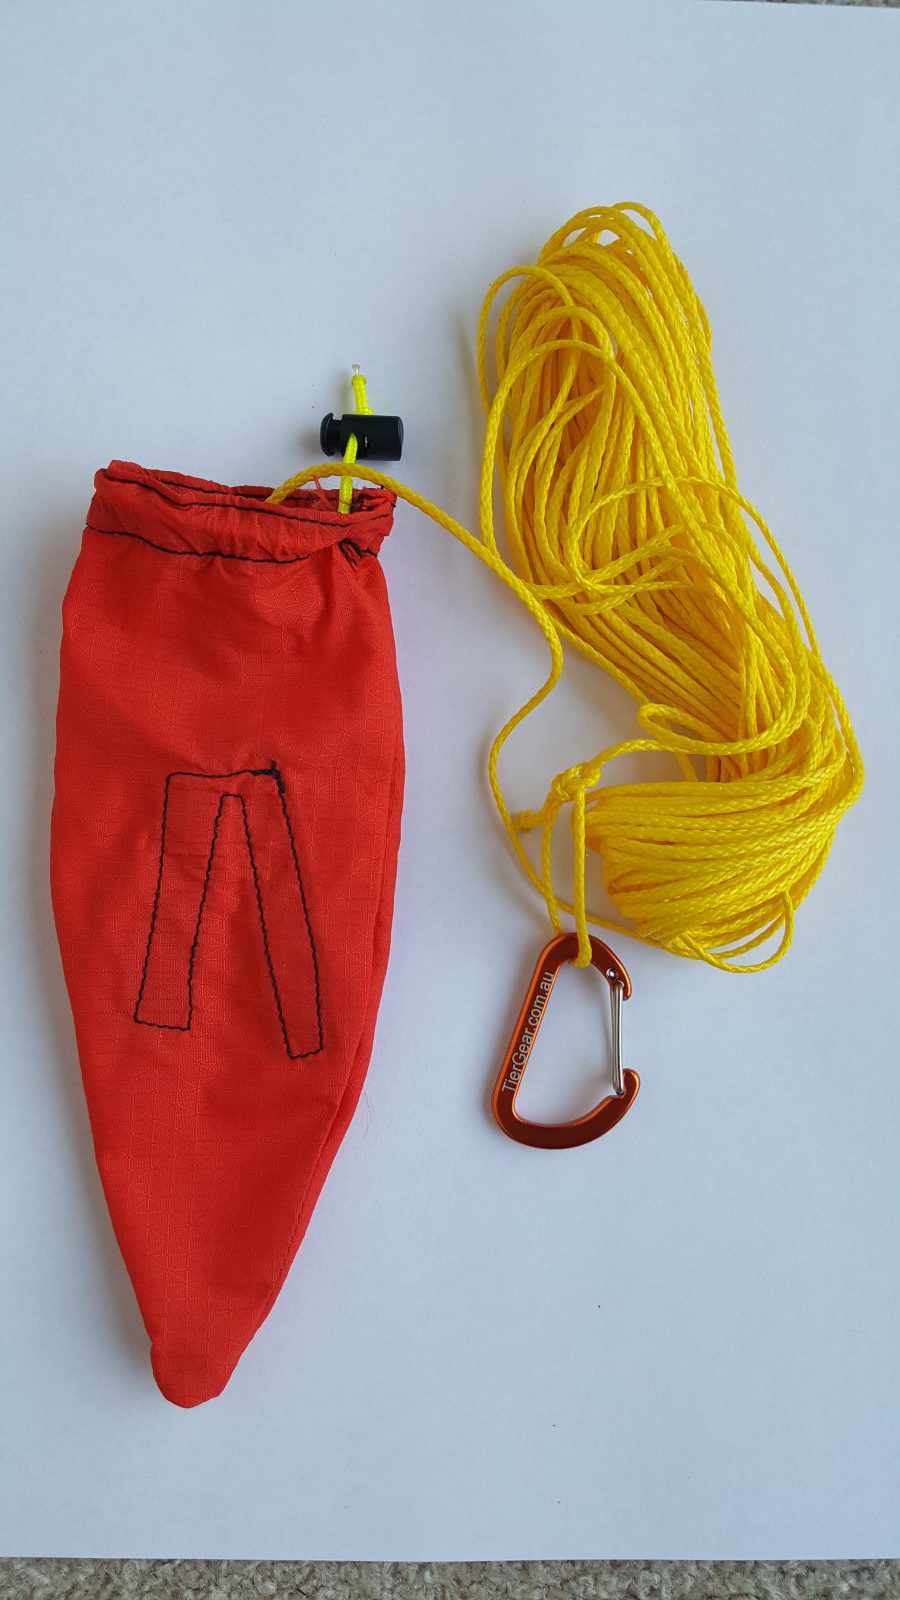
The design is simply a draw string bag shaped to minimise the chance of snagging in a tree. It has a cord lock on the inside which is used to attach the throw line in a way that can be easily removed.
In use, you remove the line from the bag and find a suitably sized stone or gravel which is cinched into the bag with the draw string. This is then used as a throw weight to get the line over a tree branch. The line can be easily removed from the bag if needed to simplify later retrieval.
To make this throw bag, you will need the following:
- 16 x 21 cm of suitable cloth
- 32 cm of 13mm nylon grosgrain
- Polyester thread (Rasant 75 thread or similar)
- One cord tension lock for 13mm Grosgrain (Lineloc 3)
- 10 m of 1.75 mm Dyneema throw line (e.g Zing-It/Lash-It)
- 1 x small cord lock for drawstring
- 1 small carabiner to attach the antenna wire (optional)
For my cloth, I used a high strength hammock material called Hexon 2.4 (see here). However, any relatively strong fabric should do such as light canvas or synthetic pack material such as 420D Packcloth. Basically, the stronger the cloth, the longer it will last and the heavier it will be.
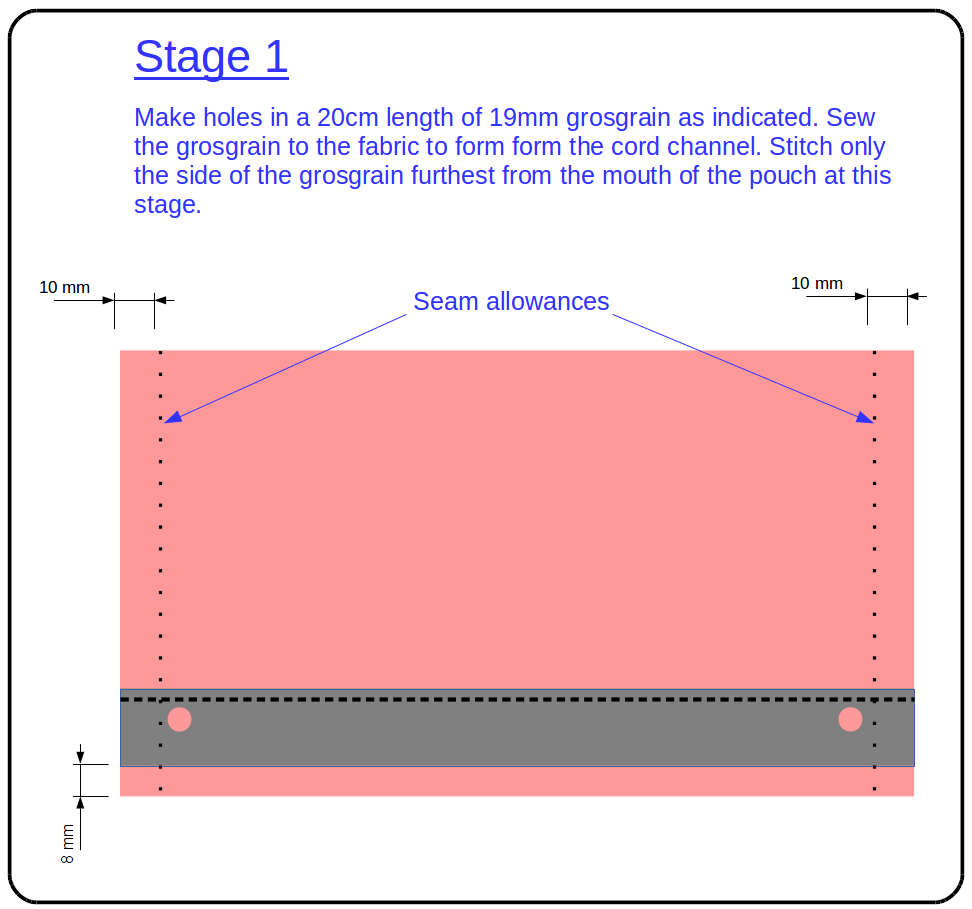
The following diagrams shows the dimensions and sew lines. Like many sewing projects, it is put together inside-out and then inverted on completion to leave a neat outer appearance.
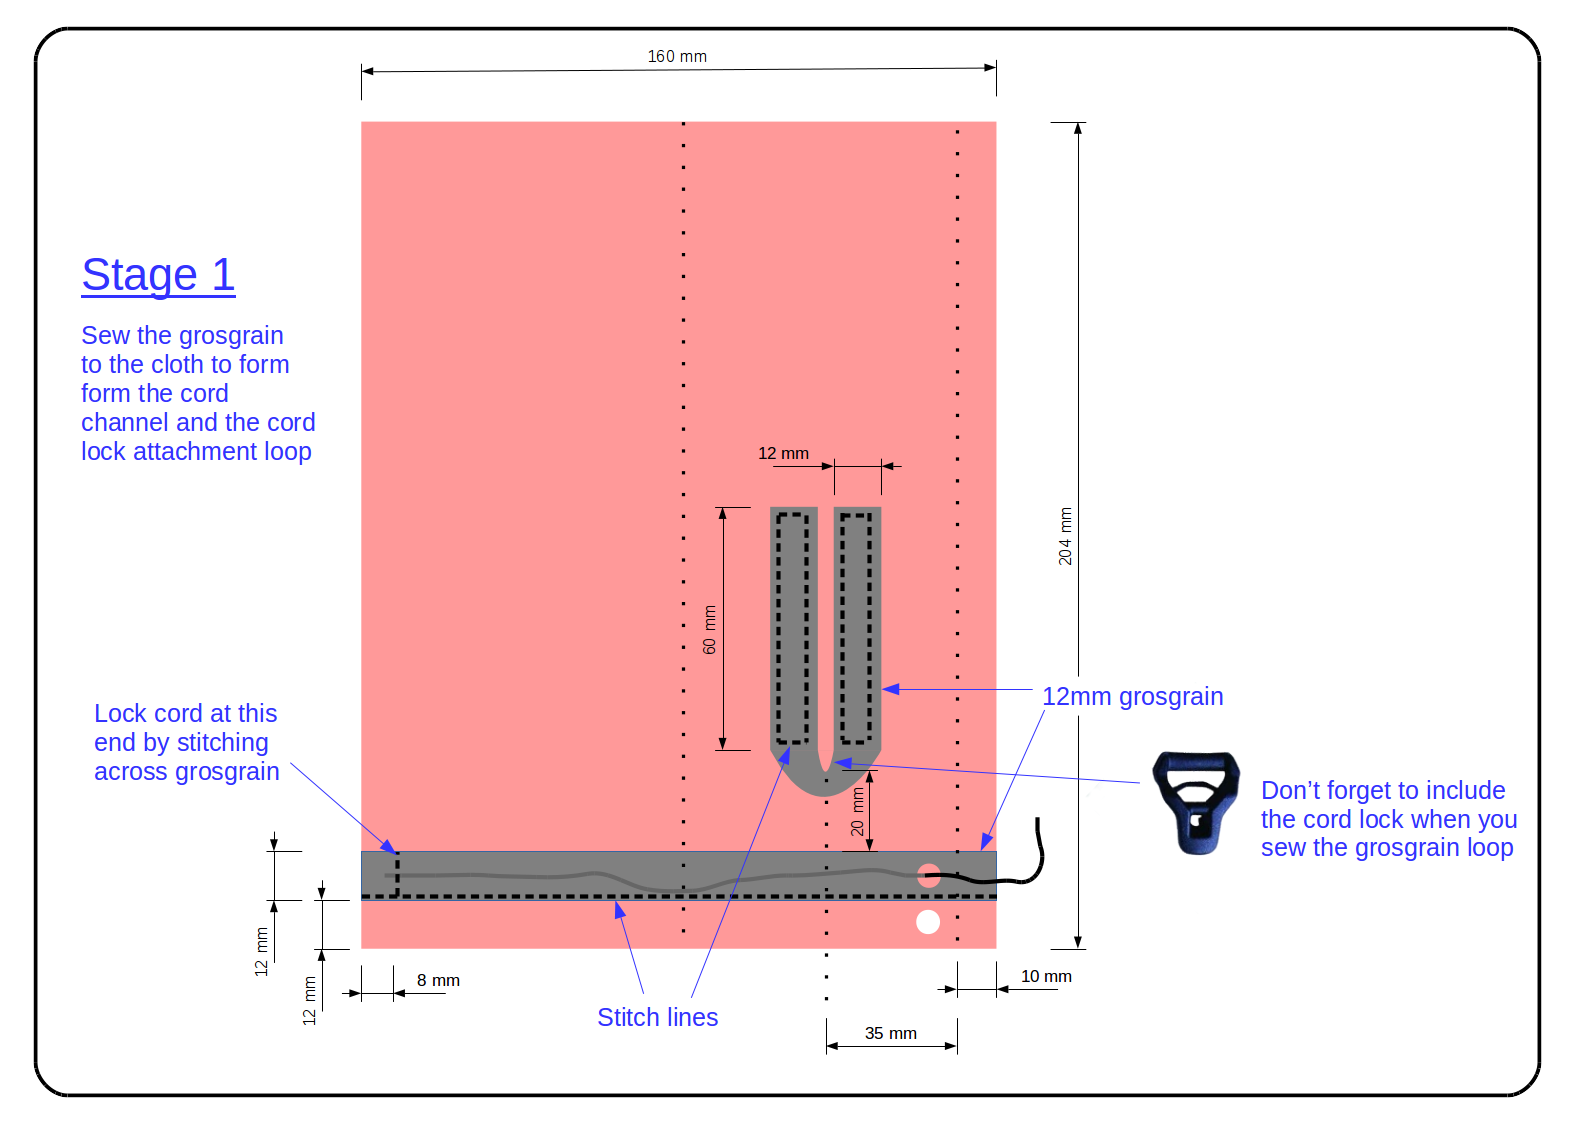
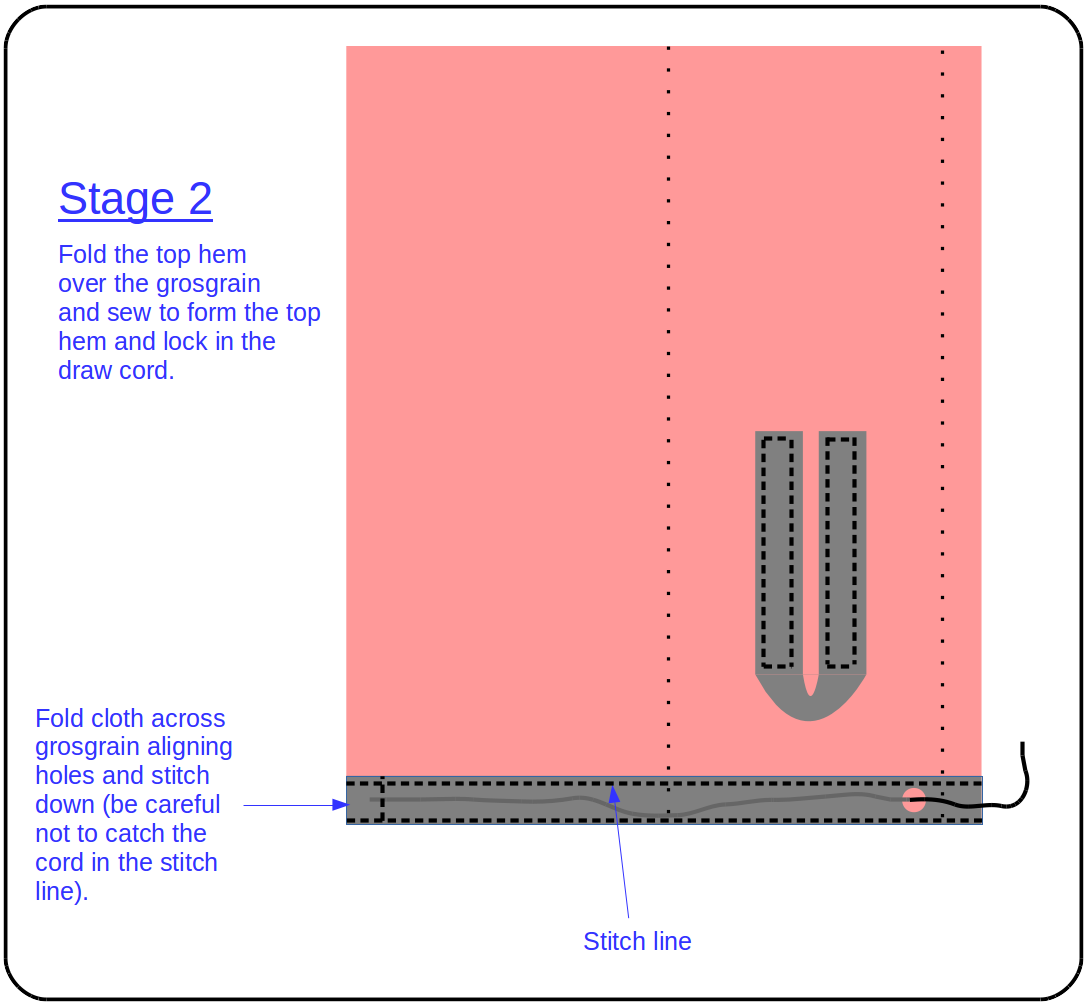
Sew with a medium length straight stitch in the order indicated. Lock the end of the stitch runs with a few forward-backward-forward stitches at the start and finish of each run.
You will need to melt a small hole in the grosgrain that forms the draw string channel and I suggest using a small soldering iron. The draw string needs to be secured at one end by stitching through it, the cloth and the grosgrain channel a couple of times. The other end passes through the hole in the grosgrain to allow cinching of the mouth of the bag. Be careful when stitching the grosgrain forming the draw string channel that you keep the draw string free to move in the channel.
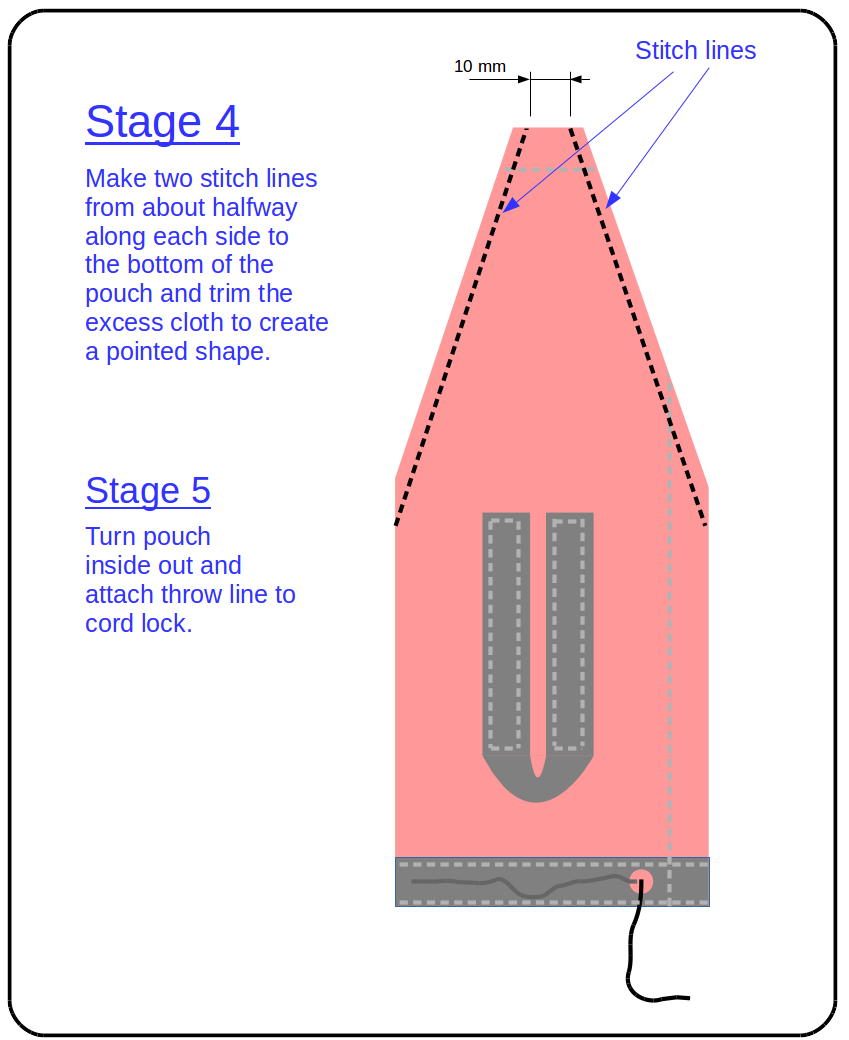
Once the final shaping stitch lines are sewn, the excess material can be trimmed and the bag turned right side out.
The throw line I use is called Zing-It and is a 1.75mm Dyneema cord with a polyurethane coating. It is very abrasion resistant and slips over tree branches easily. I find 10m is plenty as I’m rarely trying to get an antenna up any higher. If the branch is high enough that the line doesn’t come all the way back to the ground, then I tie the antenna to the tail end of the line and then allow the weight of the throw bag to pull it into the air. To subsequently retrieve it, I detach the throw bag and allow the antenna weight to pull the line down.
The finished bag complete with 10m throw line and a small carabiner weighs only 25 gm (including throw line and carabiner). Here are a few photos of the construction and finished product:


Hiking pole guy set
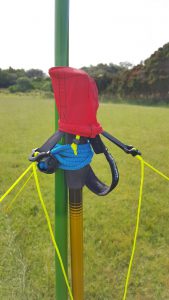
This idea was initially inspired by a post in the SOTA Reflector by Adrian G4AZS showing how he held a squid pole up using a guyed hiking pole. Subsequently Andrew VK3JBL produced a neat solution using a canvas bag with guys attached that slipped over the handle of the pole. I thought about his design and re-designed it slightly into an even smaller and lighter design as presented here.
The goal was to create a small bag that fitted over the handle of the hiking pole, and could also hold the guys in an easy to deploy manner. To make this, you only need the following:
- 20 x 11 cm of suitable cloth
- 54 cm of 13mm (1/2″) nylon grosgrain
- 40 cm of 19mm (3/4″) nylon grosgrain
- Polyester thread (Rasant 75 thread or similar)
- 3 x cord tension lock for 13mm Grosgrain (Lineloc 3)
- 6-8 m of 2-3mm guyline cord
- 3 lightweight tent pegs (stakes) suitable for the ground
- 1 x small cord lock for drawstring
For my fabric, I used a high strength hammock material called Hexon 2.4. However, any relatively strong fabric should do such as light canvas or synthetic pack material (e.g. 420D Packcloth.)
The dimensions can of course be adjusted to suit different sized hiking pole handles and hiking pole lengths.
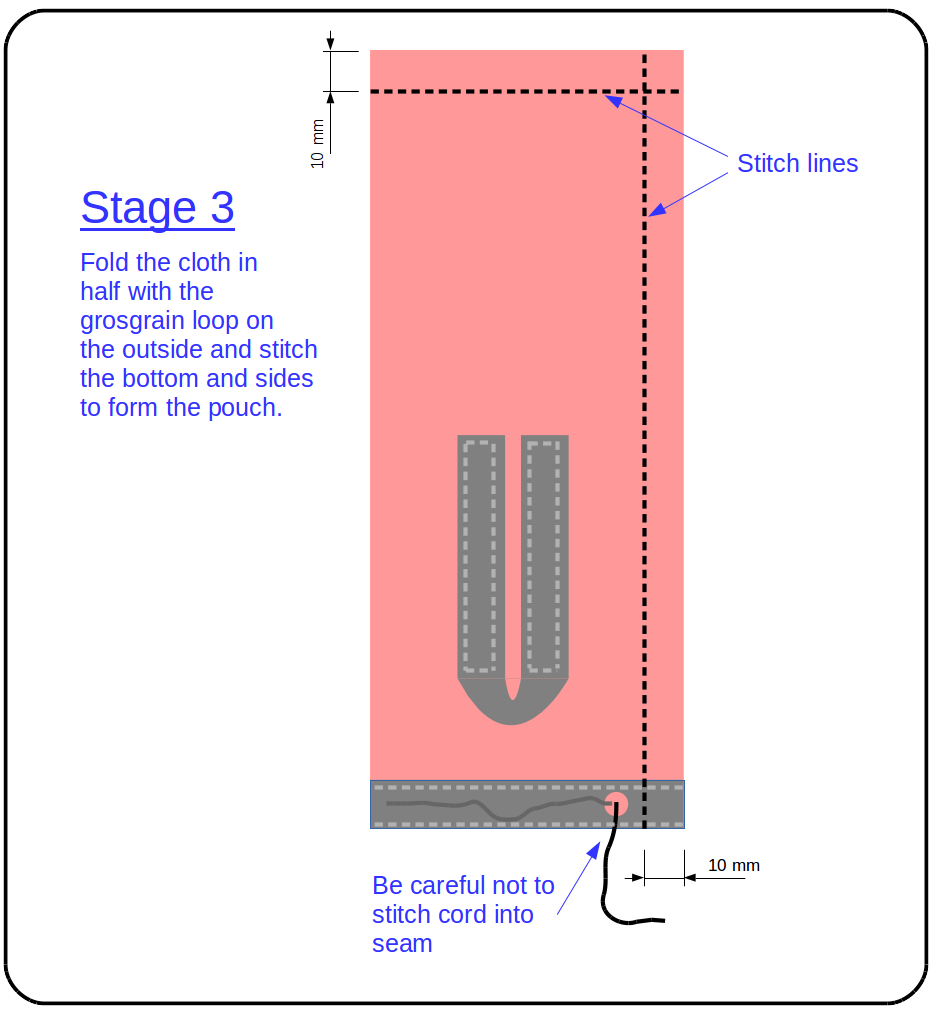
Below are a series of diagrams which illustrate how this is constructed. Essentially, it’s a simple draw-string bag reinforced with three grosgrain loops that take the guy line tension. The guylines are attached to the cord locks and terminated in simple bowline loops around tent pegs (stakes). Having the tension locks at the top makes it much easier to deploy as you can adjust guy tension whilst holding the pole upright.
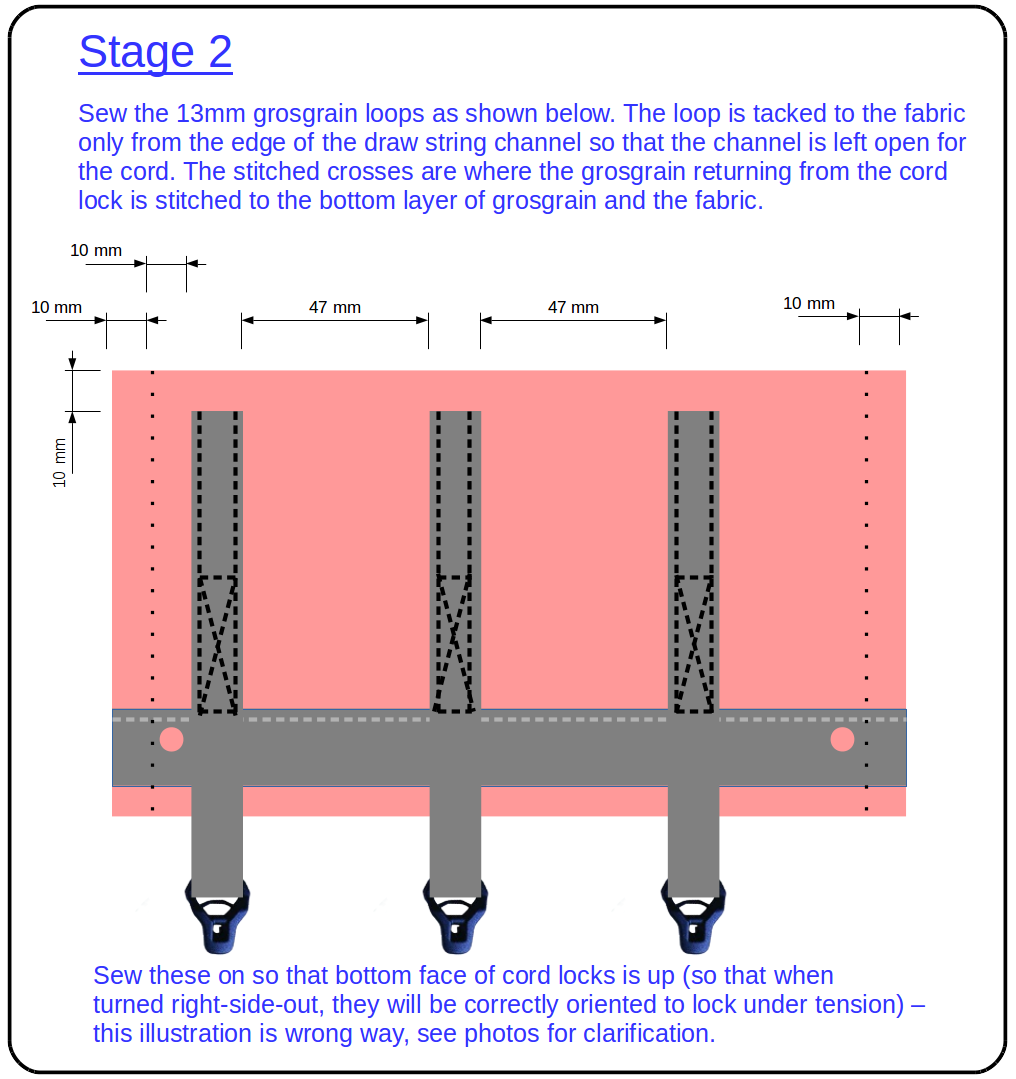
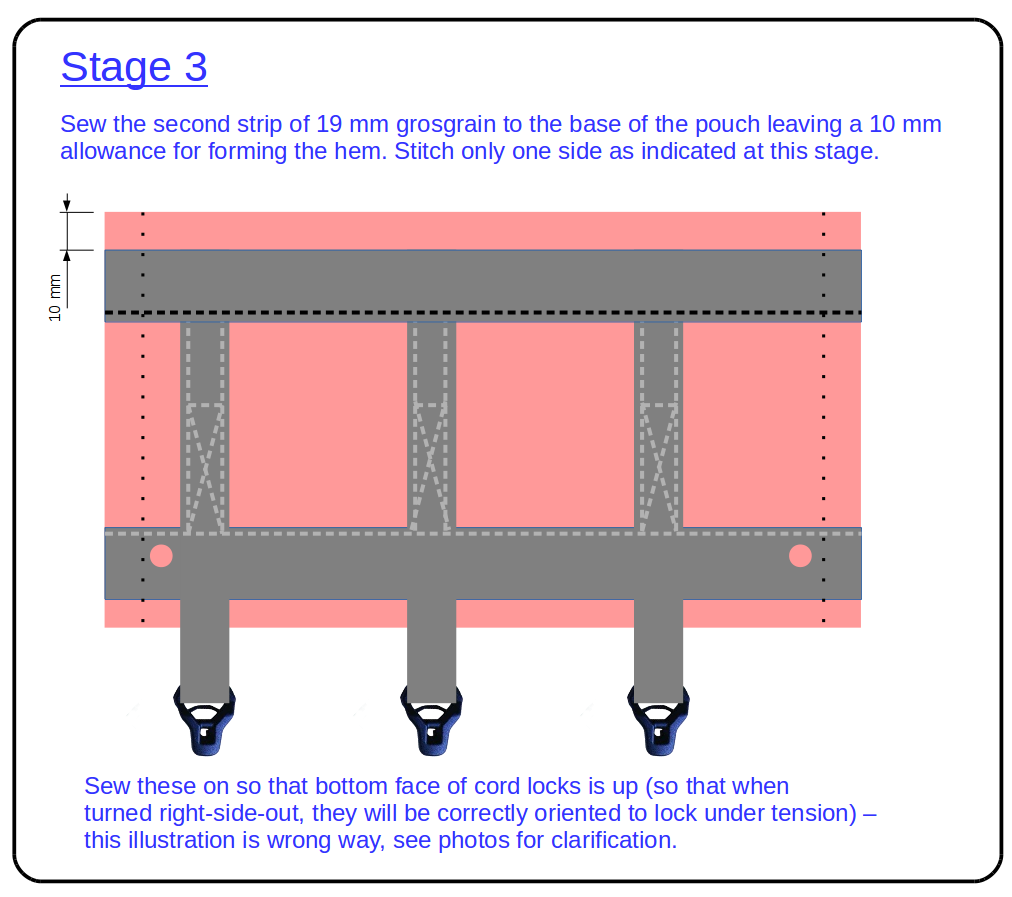
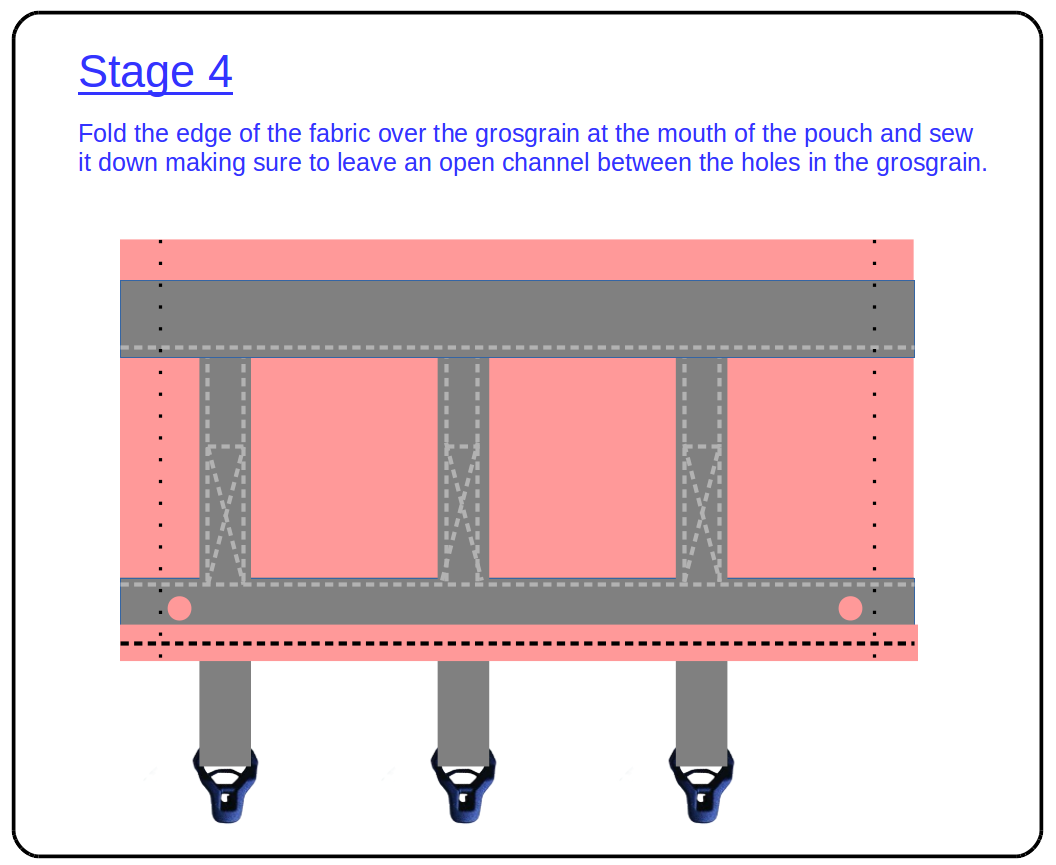
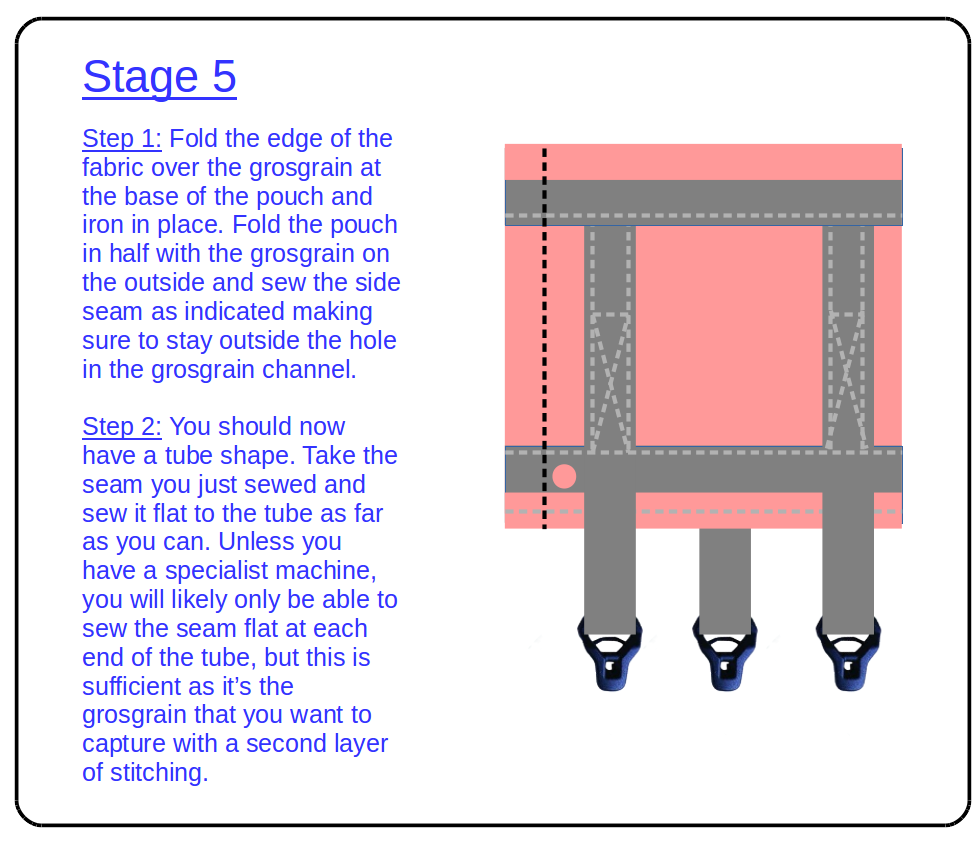

Sew in the order indicated using a medium length straight stitch, noting that you are sewing the bag inside out. Don’t forget to thread the cord tension locks onto the grosgrain loops before sewing them! The easiest way to make holes in the grosgrain for the draw string is to melt them using a small soldering iron (alternatively a very hot metal skewer would work). Do this before sewing the grosgrain to the fabric!
In my case, the finished product is quite compact and weighs only 35 gm (including guy lines). It is small and light enough to be a permanent part of my kit. Here are a few photos of the finished product:


Sourcing materials
It’s sometimes hard to find the materials used in these projects. In Australia, Tier Gear in Tasmania was an excellent source of materials for these types of DIY projects, but appears to be moving away from supplying raw materials. In the USA, try Dutchware Gear which has mostly the same as Tier Gear, and many more options. Not sure about UK/Europe – let me know if there is a good source.
Awesome bits of kit that are properly thought out to serve a higher purpose. Ham Radio is innovation and this is an excellent example of a problem solved elegantly. Now to find a sewing machine at the next rally (hidden among the 3d printers) and valve radios.
Next up EDC and antenna pouches?
Thanks! Had to look up EDC, not a term we use here – EDC and antennas fit fine in my backpack, so answer is probably no. A squid pole bag maybe…
I came for the the BCB filter but love the sewing projects!
Especially the empty bag that stows the throw line! Pure genius.
As far as your comment about an antenna bag, this is my build project for Arrows, masts and verticals, and has worked out well so far.
https://scottysfunkwerks.blogspot.com/2022/10/isnt-she-lovelypopas-got-brand-new-bag.html
Happy sewing, and throwing!
Scott ka9p
Thanks Scott. Like you, I am quite new to sewing, so I’m sure further improvements are possible, but the two items I wrote about have continued to be very useful in the field.
73 David VK3IL